How to Create a WooCommerce Child Theme

[ad_1]
Let’s say you have a WooCommerce store up and running.
If you’re using the official Storefront theme, it might even look quite professional. However, you may still want to customize the appearance of your WooCommerce store to match your vision.
The best solution is often to create a WooCommerce child theme. That’s because a child theme enables you to make changes to your original theme without editing it directly. It simplifies the process of customizing your store’s appearance and eliminates potential risks to your theme and store.
In this article, we’ll look at how you can style your WooCommerce store using themes. Then, we’ll show you how to create your own child theme in just five steps. Let’s get started!
A Quick Look at WooCommerce Themes
With the launch of the WooCommerce plugin in 2011, WordPress became the most popular e-commerce platform. WooCommerce is currently used to power 25% of all online stores, making it 6% more popular than its closest competitor.
One of the elements that has made WooCommerce so successful is how easy it is to create a unique store with minimal effort. However, this alone doesn’t explain the platform’s popularity.
Another huge factor in WooCommerce’s success is the nearly infinite customization possibilities it offers. When combined with the right theme, you have access to a lot of design flexibility.
WooCommerce is compatible with almost all WordPress themes. However, most of them will not be optimized to handle the unique features of the plugin.
Fortunately, the Storefront theme is an excellent option. This is the official WooCommerce theme, built specifically to integrate with the plugin. It looks compelling right out of the box, with a simple and clean design that puts the focus on your products:

This bare-bones design also makes Storefront an ideal base for customization. This is where child themes come in handy, which we’ll look at next.
Why You Might Want to Create a WooCommerce Child Theme
If you’ve spent much time reading up on WordPress, you’ve probably come across child themes before.
In short, a child theme starts life as a copy of another theme, which is known as the ‘parent theme’. You can then make changes to the child theme and test them out without editing the parent theme directly. This is important because altering the original theme can result in irreversible errors and even damage to your website.
You might create a child theme because you want to use another theme as a basis, rather than having to build a new theme entirely from scratch. Alternatively, you may only want to make some minor changes to a theme’s branding or overall aesthetic. The sky really is the limit, depending on how much time you’re willing to devote to the project.
When it comes to WooCommerce, most child themes are based on Storefront:

You can download several child theme options from the official WooCommerce store or from other sites like ThemeForest. However, it’s possible that none of the existing child themes offered match your needs, or you may simply want to create a unique look. What’s more, you might not want to spend money on a premium theme if you feel you could do better yourself.
In a post on the official WooCommerce blog, the plugin’s developers discuss the most common motivation behind using a child theme for your online store:
“The aim with our own Storefront child themes is to deliver a store experience perfect for your own niche. After installing Galleria, and not touching any settings, you instantly have a store fit to sell high-end fashion items. With ProShop, you can rapidly set up a stylish sports store.”
The actual process of creating a child theme is the same whether you’re making one specifically for WooCommerce or for a more general WordPress site. However, you will need to keep your store’s purpose in mind as you customize your child theme. An e-commerce site requires a different design philosophy than a blog, after all. Let’s see what this process looks like in practice!
How to Create a WooCommerce Child Theme (In 5 Steps)
Now, we’re going to walk you through how to create a WooCommerce child theme. In this example, we’ll create a basic theme that uses Storefront as its parent, although you can use any theme as a base.
We’ll show you how the process works when starting from scratch. However, if you want to skip some of these steps and get straight to customizing your site, you can also download and install a sample Storefront child theme.
Finally, we highly recommend creating a backup of your site before you proceed any further. This will keep your store safe if something breaks during the development process.
It’s also smart to use a staging environment for creating and tweaking your child theme. Once you’ve taken these security precautions, you can proceed to the first step!
Step 1: Make a Folder for Your WooCommerce Child Theme
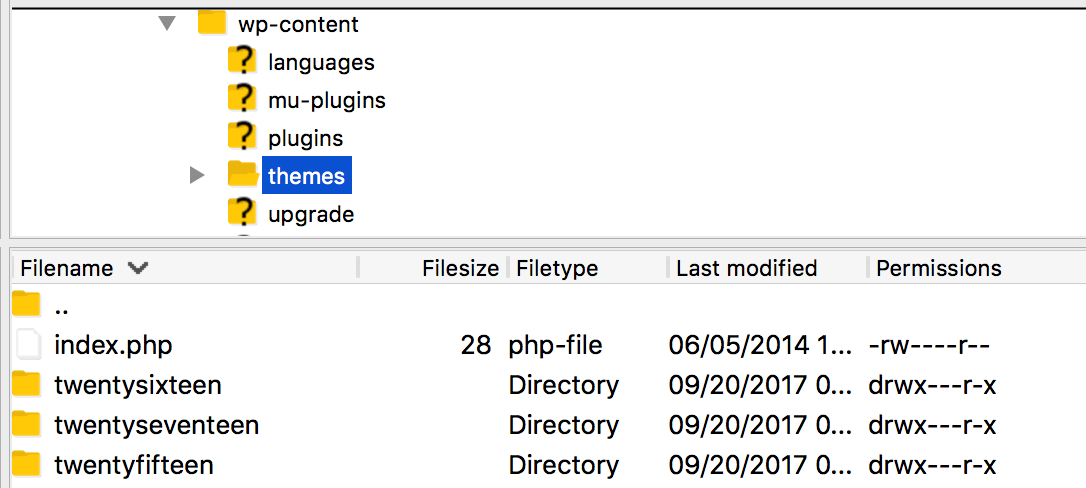
The first thing you’ll need to do is to create the folder that will contain your theme. If you’re adding the child theme directly to an existing site, the best way to do this is via SFTP. You can do this using a free application like FileZilla.
Once you have the program up and running, log in to your site with your hosting credentials. Then, you’ll need to navigate to the wp-content/themes/ folder. This is where your site’s themes are installed.
All you need to do is create a new folder within this one:

When creating a child theme, it’s best to give it a name that reflects the parent. For example, we’re making a child theme for Storefront, so we’ll name our folder “storefront-child.”
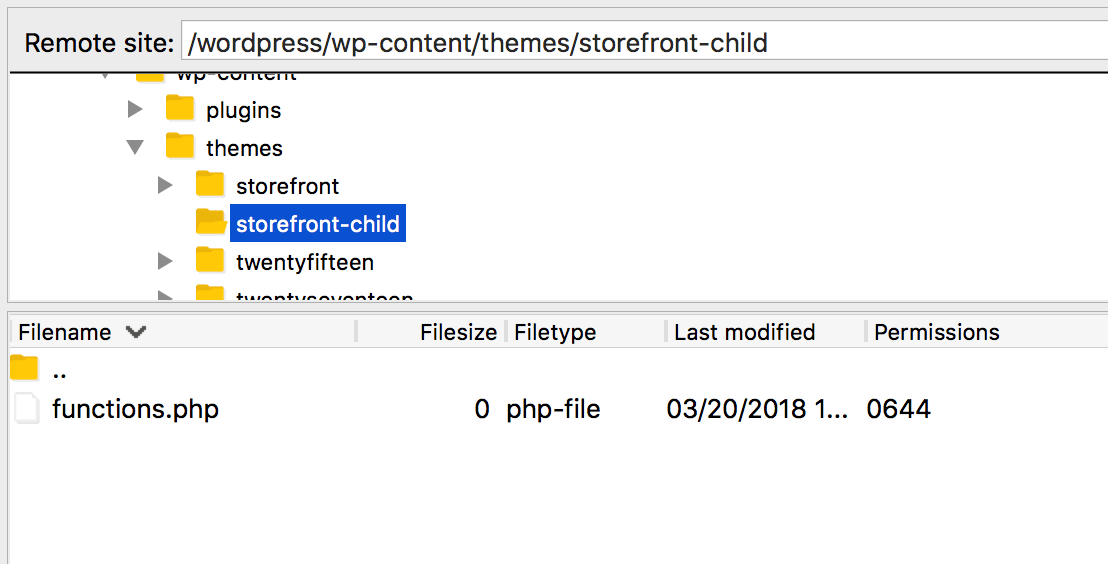
The first thing you’ll need to create and place in this folder is a simple text file called functions.php. This is an important core file that helps to dictate how your site looks and acts. However, most child themes can use the functions contained in the parent theme’s file and don’t need their own.
For that reason, this file can be left blank for now. Simply create a text file with the name functions.php, and save it in your child theme’s folder:

Your theme is now almost ready to be activated and used. First, however, it will need a stylesheet.
Step 2: Create Your Child Theme’s Stylesheet
The next file you need to create is your theme’s Cascading Style Sheet (CSS). This file defines the styles that will be applied to your site’s pages and content. In other words, it enables you to specify the look of individual elements on your website. When people talk about updating styles, they’re usually referring to updating a site’s CSS file.
Your parent theme will already contain a stylesheet, but a child theme’s CSS can be used to override those styles. We’ll look at how exactly this works later on.
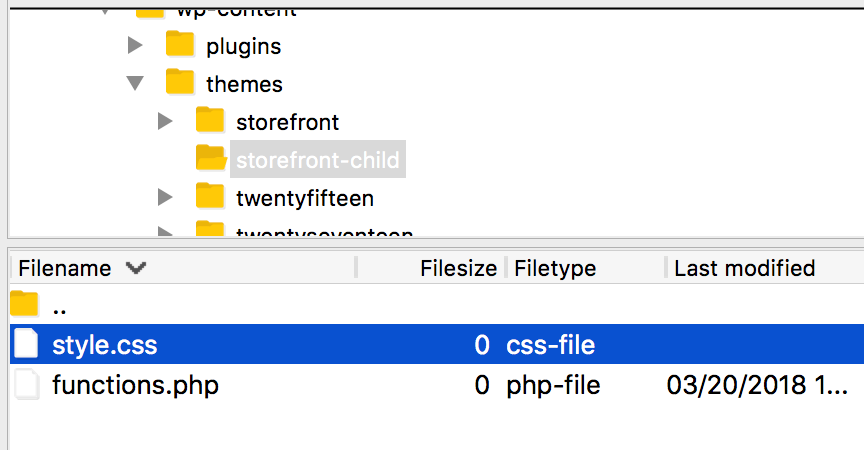
For now, you’ll just need to create the CSS file. To do this, once again add a text file to your wp-content/themes/storefront-child folder (or whatever name you used for your own child theme). This one should be called style.css:

You’ll also need to add some basic information. Copy and paste the following snippet into your new style.css file:
/*
Theme Name: Storefront Child
Theme URI: http://example.com/storefront-child/
Description: My first WooCommerce child theme
Author: Your Name
Author URI: http://example.com
Version: 1.0.0
License: GNU General Public License v2 or later
License URI: http://www.gnu.org/licenses/gpl-2.0.html
*/
These are the details about your theme that you’ll see when viewing it in a theme directory or in your WordPress dashboard. Feel free to replace the placeholder data with information more specific to you and your theme.
Step 3: Configure the Child Theme to Inherit the Parent Theme’s Styles
As we’ve already mentioned, you’ll want your child theme to use the parent theme’s default styles. However, you’ll also need to override the styles you want to change. This might sound complex — and CSS can indeed get tricky — but at its core, the child will always use the parent theme’s styles unless it specifically contains a replacement.
For example, let’s say your parent theme defines the style for h1 header elements as 20px and red. If the child’s style.css file does not contain an entry for H1 headers, then the parent style will be applied to all H1 content. However, if we were to add an H1 style to the child’s stylesheet that defined these headings as 18px and blue, it would override the parent’s directions.
Adding this functionality to your child theme is actually very simple. All you need to do is to reference your parent theme in your child’s stylesheet.
Simply add the following snippet after the information you pasted into the style.css file earlier:
Template: storefront
This code defines the parent theme and will ensure your child theme uses Storefront’s styles wherever you have not specified a replacement. If you’re creating a child for a different theme, you can simply use its folder’s name instead.
Get Content Delivered Straight to Your Inbox
Subscribe to our blog and receive great content just like this delivered straight to your inbox.
Step 4: Activate the Child Theme
At this point, your child theme is now technically ready. It’s configured to work on your site, so let’s activate it and see how it looks.
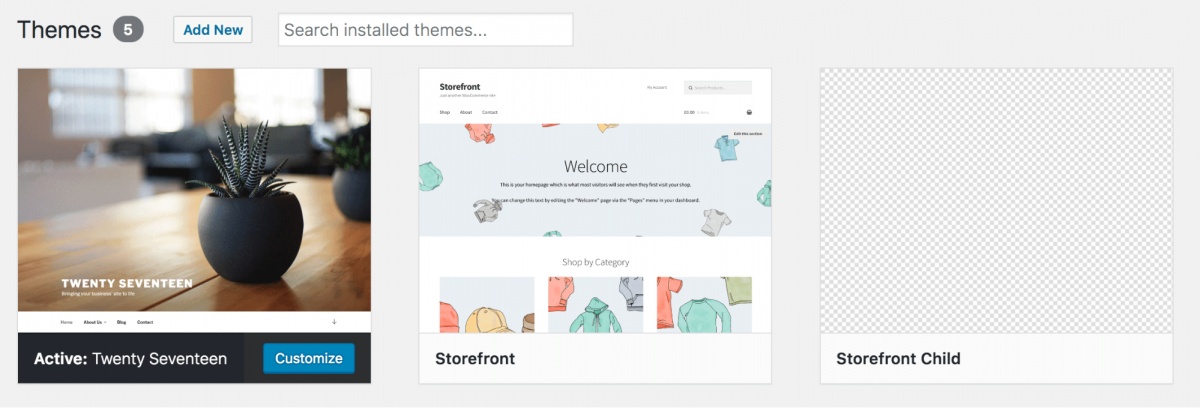
Go to Appearance > Themes in your WordPress dashboard, and you’ll see your child theme already installed:

Select Activate to make it your site’s current theme. You can now preview it from the front end:

As you can see, it looks exactly the same as the original theme right now. While the child theme is active, all it’s doing is pulling in the styles from your parent theme. To customize its appearance, you’ll need to get creative with your child theme’s stylesheet.
Step 5: Add Styles to the Child Theme
Finally, it’s time to start styling your child theme. Exactly how you do this is up to you, your creativity, and what you want your store to look like. However, let’s walk through an example of what you can do.
To illustrate how editing your child theme works, we’ll change the look of our store’s buttons. At the moment, they appear gray with black text, but we could update this styling to make them stand out more:

Open your child theme’s style.css file again, and add the following code after the last */ in the file’s header:
a.button,
button.button,
input.button,
#review_form #submit {
background: pink;
color: red;
}
If you save your file and view it on the front end now, you’ll see the change in action. The buttons will now be a vibrant pink with red text:

You can also make changes to your theme’s template files. You’ll just need to copy the template file you want to alter, such as header.php, from your parent to your child theme folder.
However, you’ll also need to make some changes to specify which function WordPress uses to reference the template files. This requires using the get_stylesheet_directory(); function instead of get_template_directory() to reference your templates.
To learn more about how to do this, you can read about all the templates that WooCommerce uses.
At this point, you have created a WooCommerce child theme! Of course, there’s plenty more you can do, but you now know how to start tinkering. We recommend you brush up on CSS to get the most out of your styling!
Create a WooCommerce Child Theme
WooCommerce makes it easy to create an online store, and you can even change its look using the Storefront theme or one of many custom themes.
However, you don’t have to rely on the creativity of others. Creating your own WooCommerce child theme is not as difficult as you might think, and it gives you nearly total control over the look and functionality of your store.
Happy selling!
Your Store Deserves WooCommerce Hosting
Sell anything, anywhere, anytime on the world’s biggest eCommerce platform.

[ad_2]
Source link
