How to Easily Enable WordPress Debug Mode to Fix Site Errors

[ad_1]
Are you looking to enable the debug mode in your WordPress site?
You might encounter different errors when working with WordPress themes, plugins, or custom codes. Using WordPress debug mode, you can easily fix these issues.
In this article, we’ll show you how to easily enable WordPress debug mode to fix site errors.
Why Enable WordPress Debug Mode?
Sometimes a WordPress plugin, theme, or custom code like PHP or JavaScript can cause conflicts on your website. This can lead to different errors, and you may notice that your site isn’t functioning properly.
Now, you can always deactivate and uninstall multiple plugins to see which one is causing the error. Similarly, you can also switch to a different WordPress theme or remove the custom codes to find the root cause of the error.
However, all of this takes a lot of time. You’ll have to rule out each plugin individually, change multiple themes, and edit custom codes.
An easier way of fixing website errors is by enabling WordPress debug mode. It shows a log of all the errors and warnings on your website. This way, you can pinpoint issues on your WordPress site and fix them quickly. It even uncovers errors that might not be visible otherwise.
That said, let’s look at how to enable the WordPress debug mode. We’ll show you 2 methods. You can use a WordPress plugin or manually view the debug mode.
Method 1: Enable WordPress Debug Mode Using a Plugin
An easy way of enabling debug mode is by using the WP Debugging plugin. This method is recommended for beginners and those who aren’t comfortable working with website files.
WP Debugging is a free WordPress plugin that works out of the box. By using this plugin, you won’t have to edit your website files manually.
First, you’ll need to install and activate the WP Debugging plugin. For more details, please see our guide on how to install a WordPress plugin.
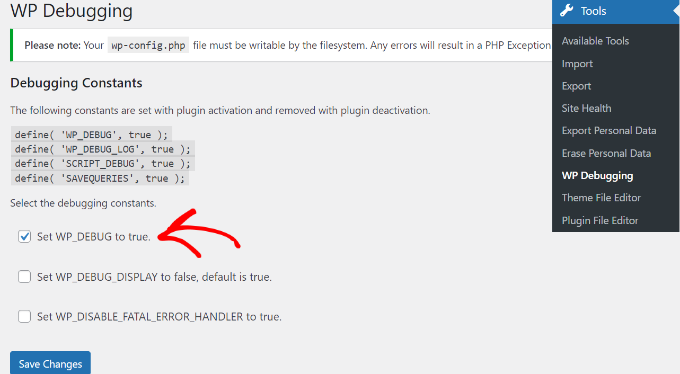
Upon activation, you can go to Tools » WP Debugging from your WordPress dashboard. Next, ensure that the ‘Set WP_DEBUG to true’ option is enabled.
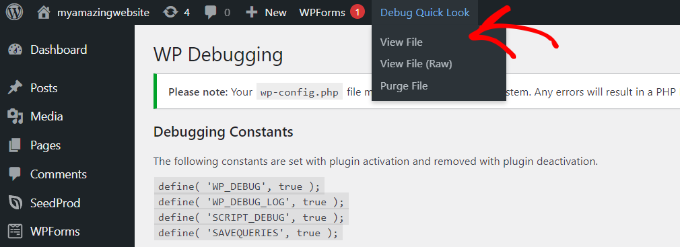
After that, you’ll see a ‘Debug Quick Look’ option added to your admin bar at the top.
Go ahead, hover over it, and then click the ‘View File’ option.
This will open the log file with all the errors on your website. You can then find out what’s causing issues on your site and quickly fix them.
When you’re done debugging your website, don’t forget to disable the plugin.
Method 2: Manually Enable WordPress Debug Mode
The second method you can use to enable WordPress debug mode is editing the wp-config.php files. This method is more advanced and suitable for users who are comfortable editing website files.
We recommend creating a backup of your website before editing files. This way, you can easily restore your website in case anything goes wrong.
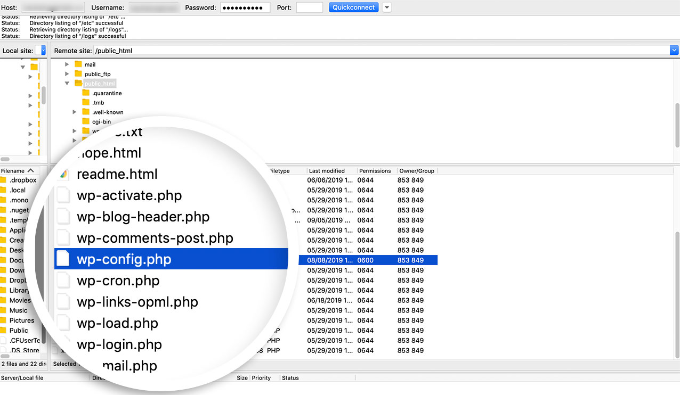
To access the website files, you’ll need a file transfer protocol (FTP) client for Mac or Windows.
For this tutorial, we’ll use the FileZilla FTP service. If you need help, then please can see our guide on what FTP is and how to use it.
Once you’re logged in, simply go to the public_html folder. Here, you’ll find the ‘wp-config.php’ file.
Alternatively, many WordPress hosting services also let you manage your site files using the cPanel.
For instance, in Bluehost, you can visit the ‘Advanced’ tab and then go to File Manager.
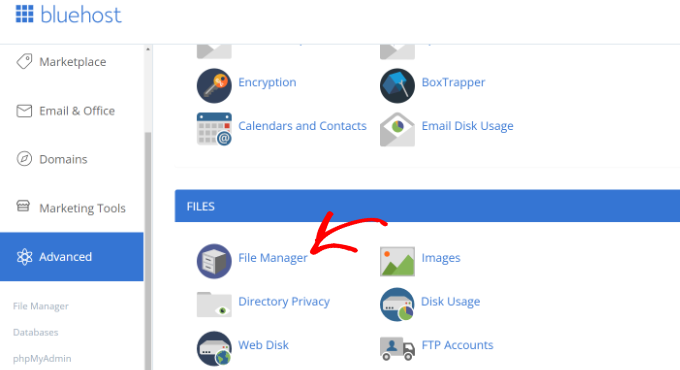
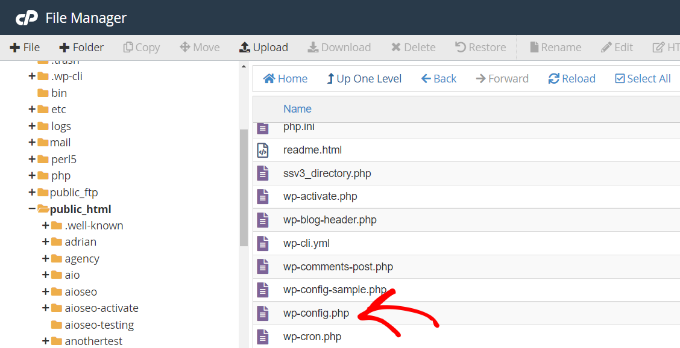
From here, simply access the public_html folder from the panel on your left.
After that, scroll down to the ‘wp-config.php’ file.
Next, you can right-click the file and download it on your computer. It’s smart to make a copy of the file as a backup, just in case anything goes wrong.
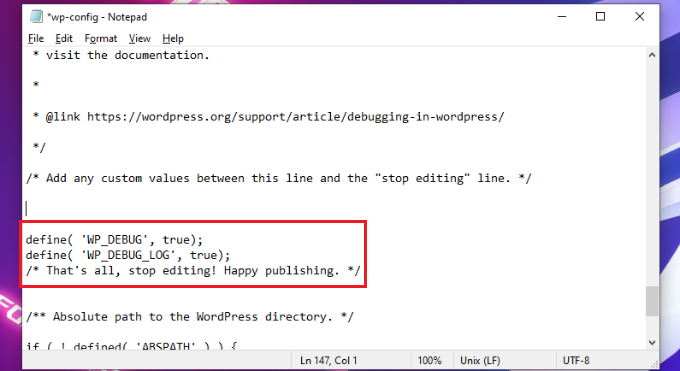
After that, open the file using any software or tool like Notepad or Sublime Text.
Once the file is open, scroll down to the ‘That’s all, stop editing! Happy publishing‘ line and add the following code before that:
define( ‘WP_DEBUG_LOG’, true);
Don’t forget to save the file before closing it.
Next, you’ll need to upload the wp-config.php file back to your website server using the FTP client.
For more details, please see our guide on how to use FTP to upload files to WordPress.
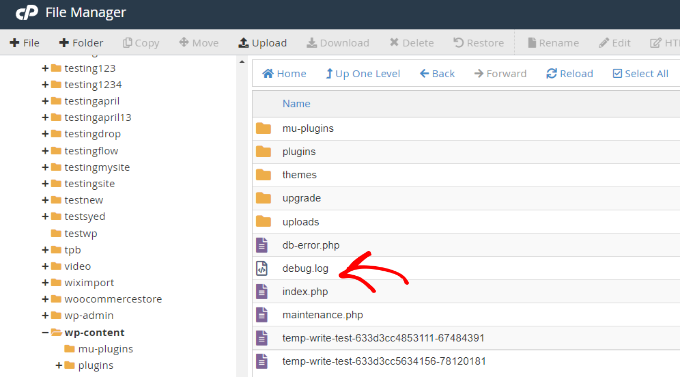
To view the error logs for your website, you’ll need to view your website files and navigate to the public_html/wp-content/debug.log path. Simply download the file and view it in a notepad software to see issues on your site.
Once you’re done debugging your site, you can disable the debug mode.
To do that, repeat these steps and then remove the code you added to the wp-config.php file or edit the following code to have a false value:
We hope this article helped you learn how to easily enable WordPress debug mode to fix site errors. You can also see our ultimate WordPress SEO guide for beginners and our expert tips on how to improve WordPress security.
If you liked this article, then please subscribe to our YouTube Channel for WordPress video tutorials. You can also find us on Twitter and Facebook.
[ad_2]
Source link